Showing posts with label p4. Show all posts

Wednesday, 12 January 2011

Ass 207 - Task 1c - Portraiture selection

first selection

Intentions/purpose of the photography to be undertaken :-

For this photographic session I am going to take a series of portraiture shots of Lee in his work clothes, during this photographic shoot I will focusing on the head and shoulders, I might also try and incorporate some work props in to the session.

Reasons for selection of theme (including inspiration from the work of others) :-

I have been looking at the images of Ian Winstanley, he seems to be able to capture the personality of each individual sitter the use of strong lighting technique and good composition helps to create great portraiture shots time after time. I will be using his shots as an inspiration source to try and improve myself during this session.

The photo imaging equipment and medium that will be used and why :-

For this photo shoot I will be using my Canon 500D camera, 18-55mm lens, shutter release cable and a hot-shoe adapter linking the camera configuration to the studio lights, during the shoot I will use a single Barn Door light, by using the door reflectors panels I can control the direction of the light and how it falls acrosss the Lee, I will also use silver light reflectors to bounce light back at my sitter.

Techniques that will be used and how they will help convey the visual message :-

For this photographic session I will be moving the light source to alter the way in which the light falls across the sitters, I will also move the position of camera from time to time to try and capture different viewpoints and to see how this alters the image composition.

Once I had discussed and it had been agreed with the tutor we set-up a black Colorama background in the studio, I wanted to keep the background as dark as possible so black background was always going to be the choice. The photographic session lasted just over an hour and quite a lot of shots were taken during this time.

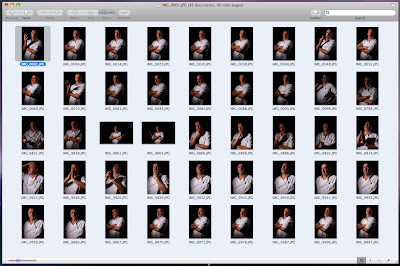
Once I had downloaded the images from my camera I was able to take a closer look at each individually shot, once I started the selection process I graded the images to help narrow down my choice to a selection of 45 images, the chosen images had to meet with the following requirements; good focus on the face, balanced lighting, good posture and composition, the selected images were imported into Lightroom where I was able to batch processed them. Once I had exported the images from Lightroom in to a new folder I reviewed the images once again and eventually made a selected of just 12, these 12 images were then opened in Photoshop ready for the next stage. 

The selected images were opened and copied acrosss into a new file which had a layer mask and picture keyline, each of the images were then reduced or enlarged to fit the picture area so that they would have a co-ordinated look and consistent size, once I was happy with each image I then individually applied some layer filters to help create the bleached look I was hoping for, the final part of the process was to save each image individually as a Hi-res and Low-res file ready for up loading to my blog.
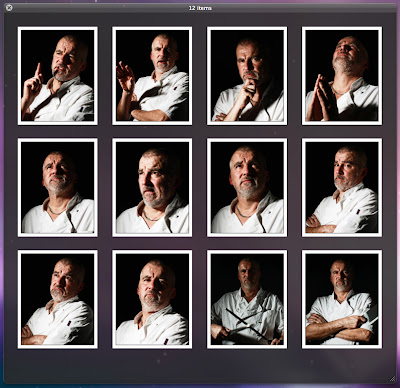
the chosen 12

Friday, 3 December 2010

Ass215 - digital image manipulation, part 5

image manipulation gallery


original image
processed image


masks and cropping

overlay, mask and crop

original processed image
greyscale manipulation
colour tints
tints and masks
retro, jumpers for goalposts


mask, layers and cropping

Ass215 - digital image manipulation, part 4

Saving images and file formats


The final part of the process is to save the work, there are many formats available within Photoshop, each format has a different use depending on the end use of the image, for this project I have used the JPEG format, it provides a file format that works well and is supported on the web and in digital print.


.JPEG (Joint Photographic Experts Group), is a widely used method of compression for digital images, the amount of compression can be adjusted, allowing for a controlled trade-off between storage file size and image quality. This format is used in the graphics, publishing, and web industries, where the requirement to control and distribute images over the internet without loosing too much perceptible quality is essential for the end user, either for traditional print requirement or to be viewed on computer screen.

The JPEG is also the most common file format used in todays creative industries and by the amateur photographer, images are saved within the digital camera. Internal settings allow the photographer to choose image output quality, large JPEG files for publishing or small JPEG options for viewing on computer or even in a digital frame.


Other file formats that might be used in the production process:


.PSD (Photoshop Document), saves an image with layers, layer-masks, clipping paths, transparency, text and many more settings, this allows the operator to re-open the saved document at any time to make changes. This file format can also be exported to and from other Adobe software products such as Illustrator, Premiere Pro, and After Effects.

.TIFF (Tagged Image File Format), is a file format used for storing image data and is widely used in the graphics, photographic, publishing industries due to its ability to handle image data within a single file source, this format is slowly being replaced with JPEG as the industries preferred format choice.

.PNG (Portable Network Graphics), is a bitmapped image format that employs lossless data compression and was designed for image transfer on the web, this file format was not designed for use in traditional print.

Tuesday, 12 October 2010

Ass 207 - Task 1b - Advertising concept theme 1

Intentions/purpose of the photography to be undertaken :-

The idea is to take one of my original rough sketch ideas for a poster recruitment campaign and to turn this early concept into a photographic image, the image needs to work with the headline “know anyone who would make the cricketer’s successful?”
I have sourced various props for this session which will be used to dress the model as a cricketing umpire. I am hoping to create an image that is both interesting and hopefully humorous.
I will also discuss with the tutor about the opportunity to try some different lenses to see how they work differently from my own in both use and the resulting images.


Reasons for selection of theme (including inspiration from the work of others) :-

I chose this theme because I wanted to see my idea develop and enjoy the opportunity to take a sketch idea free from external influence which I have in my daily work, inspiration has been gained from Rankin, his ability to capture a look, feeling or different emotion time after time for each new advertising brief and how he continually can come up with new creative ideas is something I can only try to emulate.

The photo imaging equipment and medium that will be used and why :-

For the studio session I will be using my Canon 500D with a shutter release cable and a hotshoe adapter linking to the studio lights for firing, a minimum of two lights will be used one to light the subject and one for the background, the use of reflectors might be used if I feel they can add something to the images.


The lenses I will be using are a Canon 50mm lens and a Canon 18-55mm lens. For the post production work I will be using the software Lightroom to process the work and Photoshop CS3, once ready I will upload the selected images to my blog and I will also incorporate one of the images into an artwork visual as well.

Techniques that will be used and how they will help convey the visual message :-

I will be trying different positions for the lights to see how this effects the contrast within the image and how it changes the overall look and feel of the photograph. I will also be moving the position of camera to try and get the right viewpoint. Depth of field settings will also add to the overall atmosphere of the image.

Safety considerations:-

All health and safety guidelines will be observed once the studio has been entered,I will familiarise myself and model with the fire evacuation routes from the studio. I will always keep the door clear of all obstruction, we need to find out the contact name and number of the first aider before starting work in the studio and report immediately any accident or near miss to the tutor and in general act responsible at all times and look after and tidy up all the equipment once used.

Thursday, 30 September 2010

Item & location - Homework

Due to the days disappearing fast and a full weekend of prior commitments I eventually got the chance to read the homework assignment, with a pressing deadline my prefered idea was to take the images in and around the office.


Firstly I sketch out a few ideas which I thought would meet project brief these quick sketches would help me to focus and develop my ideas a little further. The 5 photographs would depict events throughout a typical working day, I tried to take each of the 5 photographs with a different shutter speed, F-stop and ISO setting and manual focus, the images were also taken without using flash, I chose to use my 50 mm lens (macro) this choice of lens would give me a shallow depth of field and would help to concentrate the eye on the chosen item, I think it worked better for four of the images.


After looking at all the images, I made my final selection of five which I felt would work best in a square format and met the brief, the only post production undertaken was to crop the shots in Photoshop to an 8” x 8”  size and a file size of 300 dpi, during this production process I did not look at any manipulation to colour or applying filters.

My first reaction to the images would be, to keep a closer eye on the white balance next time...