Working for nearly 15 years in many photographic areas such as reportage, landscapes to lifestyle portraiture, either on location or in the studio, for me the images that really stand out are some of his portraiture shots, the way he lights the subject and how each image is cropped adds to the individual image.
Thursday, 9 December 2010
Ian Winstanley photographer
Ian Winstanley is a commercial photographer working in the Midlands and throughout the land, he started working in the music industry and has since moved professions to become an accomplished photographer.
Working for nearly 15 years in many photographic areas such as reportage, landscapes to lifestyle portraiture, either on location or in the studio, for me the images that really stand out are some of his portraiture shots, the way he lights the subject and how each image is cropped adds to the individual image.
Working for nearly 15 years in many photographic areas such as reportage, landscapes to lifestyle portraiture, either on location or in the studio, for me the images that really stand out are some of his portraiture shots, the way he lights the subject and how each image is cropped adds to the individual image.
Monday, 6 December 2010
Friday, 3 December 2010
Ass215 - digital image manipulation, part 5
image manipulation gallery
 |
| original image |
 |
| processed image |
 |
| masks and cropping |
 |
| overlay, mask and crop |
 |
| original processed image |
Ass215 - digital image manipulation, part 4
Saving images and file formats
The final part of the process is to save the work, there are many formats available within Photoshop, each format has a different use depending on the end use of the image, for this project I have used the JPEG format, it provides a file format that works well and is supported on the web and in digital print.
.JPEG (Joint Photographic Experts Group), is a widely used method of compression for digital images, the amount of compression can be adjusted, allowing for a controlled trade-off between storage file size and image quality. This format is used in the graphics, publishing, and web industries, where the requirement to control and distribute images over the internet without loosing too much perceptible quality is essential for the end user, either for traditional print requirement or to be viewed on computer screen.
The JPEG is also the most common file format used in todays creative industries and by the amateur photographer, images are saved within the digital camera. Internal settings allow the photographer to choose image output quality, large JPEG files for publishing or small JPEG options for viewing on computer or even in a digital frame.
Other file formats that might be used in the production process:
.PSD (Photoshop Document), saves an image with layers, layer-masks, clipping paths, transparency, text and many more settings, this allows the operator to re-open the saved document at any time to make changes. This file format can also be exported to and from other Adobe software products such as Illustrator, Premiere Pro, and After Effects.
.TIFF (Tagged Image File Format), is a file format used for storing image data and is widely used in the graphics, photographic, publishing industries due to its ability to handle image data within a single file source, this format is slowly being replaced with JPEG as the industries preferred format choice.
.PNG (Portable Network Graphics), is a bitmapped image format that employs lossless data compression and was designed for image transfer on the web, this file format was not designed for use in traditional print.
Ass215 - digital image manipulation, part 3
Black and White conversion
To convert a colour image in Photoshop to Black & White there are a few different ways for this task to be completed, the quickest and simplest way to convert an image is to change the colour mode to Grayscale, this way of converting the image discards the colour from the image coupeletly and cannot be reversed once the file has been saved.
To change the colour image to grayscale (fig.1) we need to alter the colour Mode, this can be found on the header bar under the Image heading, once the image has been converted to grayscale it can be worked on further in Photoshop by using various filters, layers and any number of combinations.
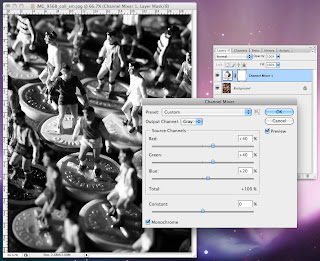
The second possible option is the Chanel Mixer (fig.2), this is found via the Image header under the Adjustments sub-window. With this option you click the Monochrome button first and then you use the RGB slide bars to control the look of the image, the source chanels should make up a total score of 100 for the best result, once you are happy with your image you click OK and a chanel mixer layer is located above the original image, this way of working allows you to retain the colour image within the PSD file.
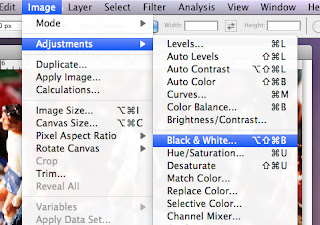
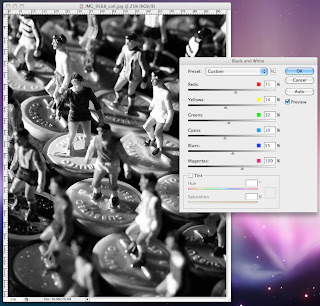
For the third convertion (fig 3.) you could use the Black and White layer option, this option is also found under Image heading scrolling down to Adjustments and in the sub-window you can select Black and White..., this option automatically converts the image to grayscale, providing you with 6 slide bars to alter the image (fig.4), giving you good control on the final output, also with this option you have some saved Prests which can be used as a starting point to manipulate the image. The final tool within this option is the Tint tool, by using this option you can convert the image to a single colour image.
An alternative working method is to use a layer mask, by clicking on the Create new fill or adjustment layer button (fig.5) found at the bottom of the Layers pallet, an adjustment mask is positioned above the colour image, this works for both the Chanel Mixer and the Black and White layer option.
By using this method the original image can be worked on in the grayscale mode without the loss of colour to the original base layer image, by clicking on the mask layer you open up the mixer window (fig.6) this is where the image can be manipulated, once you are happy with the image it can be re-named and saved as a PSD, saving the image as a PSD file allows you to re-open the file and make as many changes and tweaks as you require in the future.
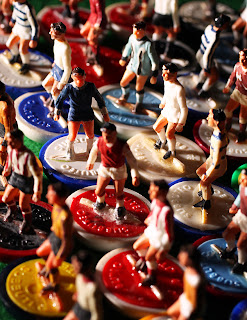 |
| cropped original colour image |
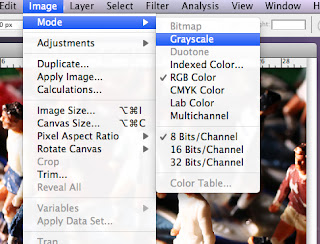 |
| fig.1 |
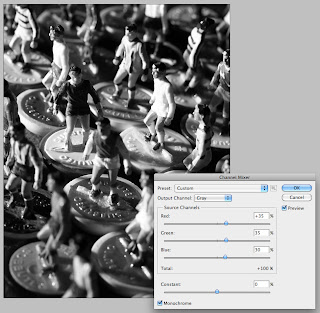 |
| fig.2 |
 |
| fig.3 |
 |
| fig.4 |
For the third convertion (fig 3.) you could use the Black and White layer option, this option is also found under Image heading scrolling down to Adjustments and in the sub-window you can select Black and White..., this option automatically converts the image to grayscale, providing you with 6 slide bars to alter the image (fig.4), giving you good control on the final output, also with this option you have some saved Prests which can be used as a starting point to manipulate the image. The final tool within this option is the Tint tool, by using this option you can convert the image to a single colour image.
 |
| fig.5 |
 |
| fig.6 |
Ass215 - digital image manipulation, part 2
Combining images, use of Masking and cropping
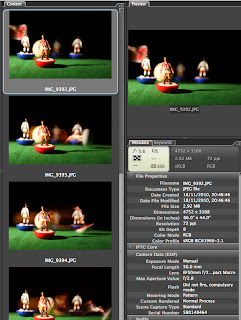
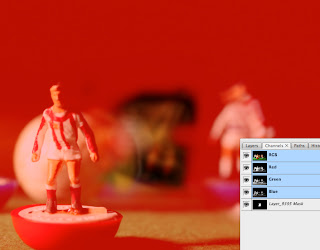
The first part of the process was to select images that I felt worked well together, what I was hoping to show was movement of a small subbuteo player accross the playing cloth.
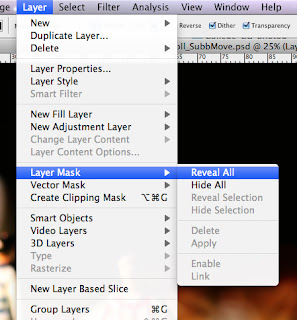
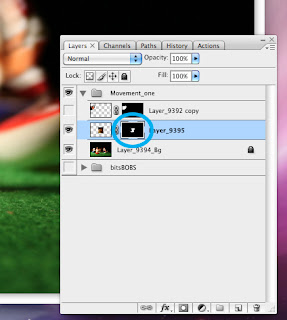
I opened my chosen three images separately in photoshop and then I transfered two of the images to image 9394, this created a layered file ready for the next stage. I had chosen to use image 9394 for my background base layer because I felt the players positions would work the best in this montage file.
 |
| original images being processed |
I opened my chosen three images separately in photoshop and then I transfered two of the images to image 9394, this created a layered file ready for the next stage. I had chosen to use image 9394 for my background base layer because I felt the players positions would work the best in this montage file.
 |
| fig.1 |
 |
| fig.2 |
 |
| fig.3 |
 |
| fig.4 |
 |
| fig.5 |
Thursday, 2 December 2010
Ass215 - digital image manipulation, part 1
Before & After image improvement
After looking at this picture I felt that this image had lost detail on the white shirt, this was due to the original camera settings when the shot was taken. What I wanted to do was to bring back detail in the shirt area and to sharpen up the overall image as well.
The first stage was to open up the file in Lightroom, with the use of the graduation filters in the Develop area I could work with Exposure, Brightness, Contrast and Saturation settings to bring back detail, if I needed the detail to be removed or tweaked in tighter areas I could use the Mask brush for this task, (fig.2).
Above image (fig.4) shows the difference between the original image and once it has processed.
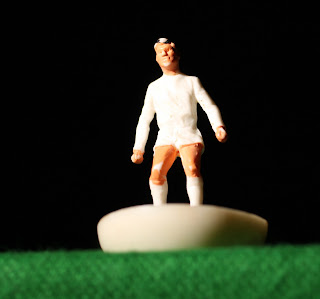 |
| original image, fig.1 |
The first stage was to open up the file in Lightroom, with the use of the graduation filters in the Develop area I could work with Exposure, Brightness, Contrast and Saturation settings to bring back detail, if I needed the detail to be removed or tweaked in tighter areas I could use the Mask brush for this task, (fig.2).
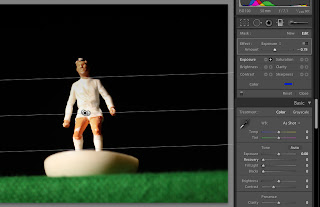 |
| fig.2 |
Once I was happy with my efforts, the file was exported in to Photoshop, the first thing I did was to duplicate the image layer, the next part of the process was for the background layer to be duplicated and an unsharp filter applied to the top layer, I did this by selecting Filter from the main menu bar, scrolling down to the Sharpen option and in the sub-window selecting Unsharp Mask, by clicking Preview and using the scroll bars I could control and view how the mask would alter the image, fig.3.
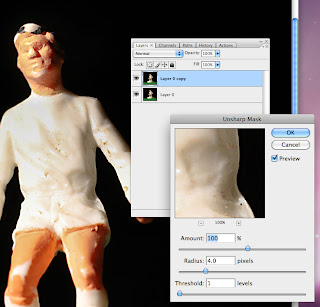 |
| fig.3 |
Depending on the image and how the filter mask looked the top layers opacity can be reduced down this final tweak is down to the personal preference and what I want form the image once I am happy with the result the two layers are then merged and saved.
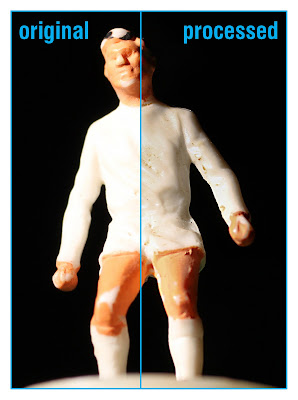 |
| fig.4 |
Subscribe to:
Comments (Atom)


