Before & After image improvement
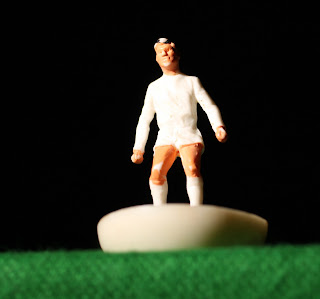 |
| original image, fig.1 |
After looking at this picture I felt that this image had lost detail on the white shirt, this was due to the original camera settings when the shot was taken. What I wanted to do was to bring back detail in the shirt area and to sharpen up the overall image as well.
The first stage was to open up the file in Lightroom, with the use of the graduation filters in the Develop area I could work with Exposure, Brightness, Contrast and Saturation settings to bring back detail, if I needed the detail to be removed or tweaked in tighter areas I could use the Mask brush for this task, (fig.2).
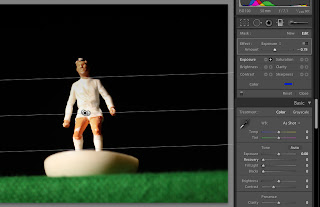 |
fig.2
|
Once I was happy with my efforts, the file was exported in to Photoshop, the first thing I did was to duplicate the image layer, the next part of the process was for the background layer to be duplicated and an unsharp filter applied to the top layer, I did this by selecting Filter from the main menu bar, scrolling down to the Sharpen option and in the sub-window selecting Unsharp Mask, by clicking Preview and using the scroll bars I could control and view how the mask would alter the image, fig.3.
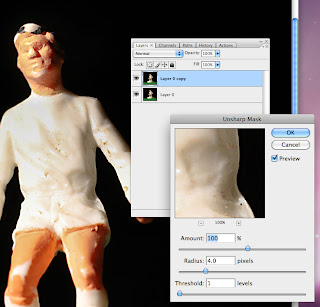 |
| fig.3 |
Depending on the image and how the filter mask looked the top layers opacity can be reduced down this final tweak is down to the personal preference and what I want form the image once I am happy with the result the two layers are then merged and saved.
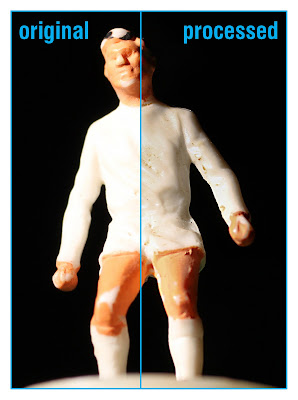 |
| fig.4 |
Above image (fig.4) shows the difference between the original image and once it has processed.


What do the tools gradient and unsharp filters do the image? What were the end results you wanted to achieve?
ReplyDeleteHi
ReplyDeleteGood selection of images that have shown the path you took in photoshop, screen grabs really do help alot in describing what you did clearly and concisely.
Steve